搜索到
107
篇与
的结果
-

-
那些平时很少用的npm配置 一、在package.json 中可以指定包为本地归档文件,让项目可离线安装依赖和编译 "devDependencies": { "@commitlint/cli": "^9.1.2", "@commitlint/config-conventional": "^9.1.2", "@commitlint/prompt-cli": "^9.1.2", "@tencent/babel-plugin-tea-component": "file:./lib/babel-plugin-tea-component-1.0.2.tgz", "@tencent/eslint-config-prettier": "file:./lib/eslint-config-prettier-2.0.0.tgz", "@tencent/eslint-config-prettier-typescript-react": "file:./lib/eslint-config-prettier-typescript-react-2.1.0.tgz", "@tencent/eslint-config-react": "file:./lib/eslint-config-react-2.1.0.tgz", |如上面的代码,在./lib 目录下存放npm包的tgz文件,然后通过 file: 前缀指定包的路径即可注意:如果包有其他依赖包,且也有离线需求,也需要放到依赖项里然后指定离线文件的位置二、可以为私有npm仓库单独指定registry 镜像源# ~/.npmrc @tencent:registry=https://mirrors.cloud.tencent.com/npm/如上面的配置,将 @tencent 下的npm包指向到腾讯镜像源,这样,即使没有修改全局的镜像源地址(即registry=https://xxx.xxxxxx.com/npm/)我们在安装依赖时,当安装到dependencies依赖项是 @tencent/xxx 开头的包时,也会从腾讯镜像源拉取依赖包npmrc的配置存在优先级,当我们在多个配置文件中定义相同的键时,npm将按照以下顺序查找和应用配置:1、项目根目录下的.npmrc文件2、用户主目录下的.npmrc文件(即上面的 ~/.npmrc)3、npm内置的默认配置三、在npmrc 中可以配置不同的镜像源的访问信息(如果镜像源设置了鉴权访问)@fm:registry=https://xxx.xxxxxxx.net/npm/ always-auth=true //xxx.xxxxxxx.net/npm/:username=在npm镜像源管理页面生成的用户名 //xxx.xxxxxxx.net/npm/:_password="在npm镜像源管理页面生成的密码" //xxx.xxxxxxx.net/npm/:email=zhangsan123@qq.com在npmrc中配置后,就不需要再拉取依赖的时候进行身份验证了
-
vue3 必要tsconfig配置 { "compilerOptions": { // Most non-library projects don't need to emit declarations. // So we add this option by default to make the config more friendly to most users. "noEmit": true, // When type-checking with solution-style tsconfigs, though with `noEmit: true`, there won't // be any `.d.ts` files emitted, but tsc still writes a `.tsbuildinfo` file to the `outDir` // for each project. If we don't explicitly set the `outDir`, it will be in the same folder // as the `tsconfig.json` file, which would look messy. // Setting it to `./dist/` isn't ideal either, because it would pollute the `dist` folder. // So we set it to a hidden folder in `node_modules` to avoid polluting the project root. // FIXME: // This caused a regression: https://github.com/vuejs/tsconfig/issues/27 // Need to find a better solution. // "outDir": "./node_modules/.cache/vue-tsbuildinfo", // As long as you are using a build tool, we recommend you to author and ship in ES modules. // Even if you are targeting Node.js, because // - `CommonJS` is too outdated // - the ecosystem hasn't fully caught up with `Node16`/`NodeNext` // This recommendation includes environments like Vitest, Vite Config File, Vite SSR, etc. "module": "ESNext", // We expect users to use bundlers. // So here we enable some resolution features that are only available in bundlers. "moduleResolution": "bundler", "resolveJsonModule": true, // `allowImportingTsExtensions` can only be used when `noEmit` or `emitDeclarationOnly` is set. // But `noEmit` may cause problems with solution-style tsconfigs: // <https://github.com/microsoft/TypeScript/issues/49844> // And `emitDeclarationOnly` is not always wanted. // Considering it's not likely to be commonly used in Vue codebases, we don't enable it here. // Required in Vue projects,缺少这两个配置,import vue文件时会报错 因为vue文件本身没有正常导出对象 "jsx": "preserve", "jsxImportSource": "vue", // `"noImplicitThis": true` is part of `strict` // Added again here in case some users decide to disable `strict`. // This enables stricter inference for data properties on `this`. "noImplicitThis": true, "strict": true, // <https://devblogs.microsoft.com/typescript/announcing-typescript-5-0/#verbatimmodulesyntax> // Any imports or exports without a type modifier are left around. This is important for `<script setup>`. // Anything that uses the type modifier is dropped entirely. "verbatimModuleSyntax": true, // A few notes: // - Vue 3 supports ES2016+ // - For Vite, the actual compilation target is determined by the // `build.target` option in the Vite config. // So don't change the `target` field here. It has to be // at least `ES2020` for dynamic `import()`s and `import.meta` to work correctly. // - If you are not using Vite, feel free to overwrite the `target` field. "target": "ESNext", // For spec compilance. // `true` by default if the `target` is `ES2020` or higher. // Explicitly set it to `true` here in case some users want to overwrite the `target`. "useDefineForClassFields": true, // Recommended "esModuleInterop": true, "forceConsistentCasingInFileNames": true, // See <https://github.com/vuejs/vue-cli/pull/5688> "skipLibCheck": true, } }
-
安装npm依赖时报node版本不支持问题解决办法 安装npm依赖时报如下错误[2024-02-26 18:00:32]error webpack-dev-middleware@7.0.0: The engine "node" is incompatible with this module. Expected version ">= 18.12.0". Got "16.15.1" [2024-02-26 18:00:32]error Found incompatible module. [2024-02-26 18:00:32]info Visit https://yarnpkg.com/en/docs/cli/install for documentation about this command. [2024-02-26 18:00:32]The command "yarn" exited with 1.手动删除 node_modules 目录并且清空了npm缓存 npm cache clean --force 重新安装还是不行执行以下命令,禁止npm扫描所有包的 engine -> node 选项yarn config set ignore-engines true
-
nginx配置返回文本或json的方法 有些时候请求某些接口的时候需要返回指定的文本字符串或者json字符串,如果逻辑非常简单或者干脆是固定的字符串,那么可以使用nginx快速实现,这样就不用编写程序响应请求了,可以减少服务器资源占用并且响应性能非常快先看返回固定的文本和json,都是在server中配置location拦截即可,配置示例如下:固定文本:location ~ ^/get_text { default_type text/html; return 200 'This is text!'; }固定json:location ~ ^/get_json { default_type application/json; return 200 '{"status":"success","result":"nginx json"}'; }保存后重新载入配置即可生效,注意:default_type必须要添加,否则浏览器会当成不识别的文件进行下载另外也可以简单的根据请求的URL返回不同的字符串,示例如下:location ~ ^/get_text/article/(.*)_(\d+).html$ { default_type text/html; set $s $1; set $d $2; return 200 str:$s$d; }这样可以简单截取url中的字符串,当然也可以用(.*)匹配所有的,实际中根据不同需求定义即可上面的就是一些简单的案例,在服务器环境中对于简单的处理,充分使用nginx可以省去一些编程工作另外补充一下中文显示的问题,因为Linux下采用的是utf-8的字符编码,默认情况下我们的浏览器在服务器没有指定编码或者静态页面没有声明编码的情况下会以GBK的编码去渲染页面,这样默认情况下返回中文的话浏览器用gbk来解析utf-8编码,显然会出现乱码,这时要在nginx location块中主动添加header来输出正确编码,添加内容为: add_header Content-Type 'text/html; charset=utf-8'; 这样浏览器就知道我们使用的是哪种编码了,或者把add_header这行换成 charset utf-8; 也是可以的原文链接:https://www.cnblogs.com/freeweb/p/5944894.html声明:本文内容来源于网络,版权归原作者所有
-
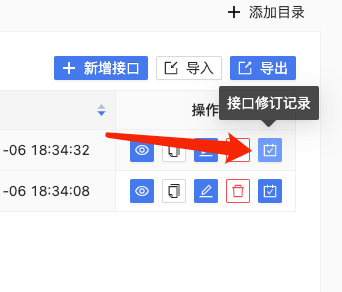
fastmock增加接口修订日志和版本记录功能 背景:应公安网警要求,平台接口内容需要有严格的操作人记录,这样当接口出现了内容违规等问题时,才能方便配合网警排查发布带违规内容的接口的修改人。再有之前有用户在群里问过是否有地方可以查询到接口的修改记录经过评估,平台做了如下调整并于2024年1月6日完成功能设计和开发,具体内容如下:平台项目和接口的删除功能由原来的真删除调整为逻辑删除,删除后的接口和项目仍然在数据库可查接口的“新增”,“修改”和“删除”操作增加日志记录,记录操作人,操作类型和保存后的接口内容接口列表页面,在操作列增加“接口修订记录”的按钮,可以跳转到修订记录页面,用户也可以查看这些记录且可以使用历史版本内容来覆盖接口内容,后续会根据用户使用情况来酌情优化历史版本管理能力,如果您也有此方面的需求,可以在社区或其他平台反馈给我们界面如下:
-
fastmock 上线接口预置模板功能 还不了解fastmock的小伙伴可以到这里 https://www.fastmock.site/docs/#/default为了方便用户快速初始化新创建的接口内容,我们在后台维护了几个常用的接口模板,例如:登录,列表接口。使用方法https://www.fastmock.site/docs/#/use-preset-api在编辑器右侧点击悬浮的按钮打开预置模板在模板列表右边点击查看模板内容,确定是你想要的初始化内容点击【使用模板】,如果您当前接口内容为新建接口,会直接使用,如果当前接口已经有内容,会提示是否覆盖,点击确定即可,下面为操作示例如果您也有更好的接口模板,欢迎在 github 的 issue 中留下您的模板内容,我们审核通过后就会在后台维护到模板库中并且会标明模板来源的github作者地址哦
-
linux常用命令备忘 linux常用命令备忘进程管理相关查看指定名称的应用进程状态ps aux | grep node查看指定端口占用情况netstat -anp | grep 8080 或 lsof -i:80VIM显示行号,预览模式下(如果在编辑模式先按ESC退出编辑模式)输入:set nu跳转到指定行:预览模式下输入 :12 跳转到第 12 行跳转行尾:预览模式下,直接输入 $ 跳转到当前光标所在行行尾跳转行尾:预览模式下,直接输入 ^ (shift+6) 跳转到当前光标所在行行尾nginx 日志查询相关统计指定日志文件下的 ip 数量awk '{ ip_count[$1]++ } END { print length(ip_count) }' /var/log/nginx/access.log打印所有访问ipawk '{ ip_count[$1]++ } END { print "Unique IP Count:", length(ip_count); for (ip in ip_count) print ip }' /var/log/nginx/access.log根据访问 ip 统计 UVawk '{print $1}' access.log|sort | uniq -c | wc -l查询访问量最频繁的 IPawk '{print $1}' access.log|sort | uniq -c |sort -n -k 1 -r|moremacos 相关显示隐藏文件defaults write com.apple.finder AppleShowAllFiles -bool true使用brew启动引用brew services list 打印所有可用服务后使用 brew services start redis-2.6 启动服务,其他服务同理Docker 相关将本地docker镜像导出保存到指定压缩文件docker save -o ~/Documents/my-project.tar my-project:v3将压缩文件的docker镜像导入到本地镜像仓库docker load --input ~/Documents/my-project.tar镜像上传到在线镜像源先将本地镜像生成一个包含完整镜像源地址的tag,docker tag my-project:v3 xxx.dockerhub.com/namespace/my-project:v3然后推送这个tagdocker push xxx.dockerhub.com/namespace/my-project:v3
-
前端性能优化之webpack打包优化 前端工程化彻底盛行的今天,我们已经习惯使用打包工具来帮助我们打包代码到最终能在浏览器运行的js或者css代码,这样我们就可以在编写代码时放心地使用所有的高级语法,其中最让前端coder感到爽快的就是 import export,我们不再需要像以前一样在html里面放很多很多script。或者使用amd。cmd,requirejs工具来写模块引用的代码,这些方便,也让我们很容易忽略一个问题,就是打包的产物的大小,当一个项目足够大时,我们的js甚至可以达到几MB到几十MB,所以,今天就来总结下关于减小构建产物体积,来达到减少首屏加载时间的内容webpack 官方自带的优化策略 https://www.webpackjs.com/configuration/optimization/这里以react项目为例,列举需要优化的构建项一、使用代码拆分,让我们的页面代码构建到单独的js,首次访问页面的时候才加载这块jsmodule.exports = { optimization: { { usedExports: true, concatenateModules: false, chunkIds: 'deterministic', runtimeChunk: true, // 将运行时依赖单独打包-运行时依赖如我们使用的async await语法所需的降级兼容代码 设置为 'single' 则所有的runtime依赖打包到一个文件 // 使用代码拆分 参考文档 https://www.51cto.com/article/689344.html splitChunks: { chunks: 'async', // webpack 打包chunk分为 entry chunk 和async chunk两种,配置文件中的entry配置的主包是默认拆分的,多个入口,多个 main chunk。async chunk就是使用import('./xxx.js') 一步模块加载方法加载的模块。那么 chunks选项就是指定这两种chunk哪些需要分包的,`initial` 只分包主包, async 只分包异步加载的包。all 分包上面两种包,这里要注意的就是all有时候会理解成“所有”就会以为所有使用了import './xxx.js'引入的包都会被分包 minSize: 20, // 超过了这个大小的包才会被拆分 minRemainingSize: 0, minChunks: 1, // 被引用次数大于这个数的包才会被拆分,这里要注意的是,被引用是只命中entry chunk 和 async chunk 的引用者才算 maxAsyncRequests: 30, maxInitialRequests: 30, enforceSizeThreshold: 100, // 超过这个大小的包,不管有没有命中上面的配置,都分包 // 对指定规则的文件使用特定的分包策略 cacheGroups: { vendors: { test: /[\\/]node_modules[\\/]/, // 匹配文件路径 type:/\.json$/, // 匹配文件类型 idHint:'vendors',// 用于设置 Chunk ID,它还会被追加到最终产物文件名中,例如 idHint = 'vendors' 时,输出产物文件名形如 vendors-xxx-xxx.js minChunks: 1, minSize: 0, priority: 2 // 设置优先级,如果文件命中多个groups策略,优先使用这个配置数字较大的规则组 } } } } } }接下来,在react路由里,将组件引入代码 import Xxxx from '@src/routes/Xxxx' 修改为如下引用方式//该组件是动态加载的 千万注意,因为组件是动态加载的,那么。就有可能出现加载失败或者加载错误的情况,所以需要使用 Suspense 组件来包裹,组件还未加载,显示fallback中的内容,组件加载完成,显示组件,加载失败会throw一个error,防止页面崩溃 const Home = React.lazy(() => import('./Home')); function Layout() { return ( // 显示 <Spinner> 组件直至 Home 加载完成 <React.Suspense fallback={<Spinner />}> <div> <Home /> </div> </React.Suspense> ); }上面的分包策略的理解注释中的内容提到了分包的条件和规则,那么,为了尽可能减小我们的主包的大小,我们就要尽可能减少在我们的 entry 选项中指定的入口文件中对其他模块的引用,或者使用异步模块引用的方式,常见的几个优化项目为优化使用到的工具的引用,将必要的工具引用单独提到一个文件中,避免打包其他没用到的代码到主包有些应用初始化相关但是跟主应用无关的代码,使用异步模块加载,如下// app.ts (async () => { const {default: AppInit} = await import('./app-init'); aegis = AppInit.tam(); AppInit.dataInsight(); AppInit.chunkError(); })();如果在入口文件中有react或者vue路由使用的组件,使用react或vue提供的异步路由方法引入使用二、将三方库通过CDN引入而不打包到我们的代码包默认情况下,我们一般都会将我们所需要的依赖,例如react,moment,axios等三方包通过npm或yarn安装到本地,然后直接import进来使用,这种方式势必就会将这些第三方包打包到我们自己的js中,且因为这些库本身体积就较大,所以会导致我们打包出来的js非常大,而且,当我们使用了chunk切分后,各个chunk都会单独打包进去这些依赖内容。针对这种情况,webpack提供了 externals 选项来让我们可以从外部获取这些扩展依赖,首先,我们需要通过script标签的形式来引入我们需要使用的三方库,有两种方式,一种是手动在 html-webpack-plugin 的html模板文件或者content内容中加入script标签,第二种是使用html-webpack-tags-plugin插件,通过配置的方式往html内容中动态插入script标签,这里推荐后者,原因是方便写判断逻辑,而不是在html中通过ejs模板语法来写判断逻辑然后,配置externals选项告诉webpack当我们使用import语句导入模块时,实际使用的是是什么内容(一般三方库都会导出一个包含了所有他包含内容的全局变量)const assetsPath = 'https://static.xxx.com/js'; module.exports = { externals: isDev ? {} : { // 排除不打包 'react': 'React', 'react-dom': 'ReactDOM', 'react-router': 'ReactRouter', 'react-router-dom': 'ReactRouterDOM', 'axios': 'axios', 'moment': 'moment', 'moment-timezone': 'moment', 'lodash': '_', }, plugins: [ ...config.plugins, new webpack.ContextReplacementPlugin(/moment[/\\]locale$/, /zh-cn|ja|ko/), new webpack.DefinePlugin(envKeys), // 开发环境不使用这种方式,因为会影响本地开发的热更新 new HtmlWebpackTagsPlugin({ tags: isDev ? [] : [ { type: 'js', path: '/react-16.11.0.production.min.js', attributes: { defer: 'defer' }, // defer: load完成后不立即执行,等带页面DOMLoaded事件执行前执行,等价于把script放到所有dom之后 publicPath: assetsPath, append: false, }, { type: 'js', path: '/react-dom-16.11.0.production.min.js', attributes: { defer: 'defer' }, publicPath: assetsPath, append: false, }, { type: 'js', path: '/react-router-5.2.1.min.js ', attributes: { defer: 'defer' }, publicPath: assetsPath, append: false, }, { type: 'js', path: '/react-router-dom-5.2.1.min.js', attributes: { defer: 'defer' }, publicPath: assetsPath, append: false, }, { type: 'js', path: '/axios-0.26.0.min.js', attributes: { defer: 'defer' }, publicPath: assetsPath, append: false, }, { type: 'js', path: '/moment.min.js', attributes: { defer: 'defer' }, publicPath: assetsPath, append: false, }, { type: 'js', path: '/lodash-4.17.21.min.js ', attributes: { defer: 'defer' }, publicPath: assetsPath, append: false, }, { type: 'js', path: '/moment-timezone-with-data-10-year-range.min.js', attributes: { defer: 'defer' }, publicPath: assetsPath, append: true, }, ], }), new CopyWebpackPlugin({ patterns: [ { from: 'public', globOptions: { ignore: ['**/index.html'], }, to: 'dist', }, ], }), ].concat(!isDev ? [new BundleAnalyzerPlugin({analyzerPort: 8889, analyzerMode: 'static'})] : []), }
-
记录在TS项目中使用eslint规范代码时遇到的问题 一、代码无法识别 as 表达式报错内容:as语句无法识别,导致(window as any).hello这种语句报错问题原因:eslint 在检测代码时,会先将代码转换为 AST 对象 而这个转换过程需要指定的解析器才能完成,eslint 默认使用的是babel解析器,而babel解析器里没有包含ts语法内容的解析器,所以,我们需要使用ts为eslint开发的解析器解决方法:确保安装了eslint以及ts eslint解析器 npm install --save-dev eslint @typescript-eslint/parser @typescript-eslint/eslint-plugin修改eslint配置文件 .eslintrc.js 中的解析器的配置项,配置内容如下module.exports = { root: true, env: { browser: true, mocha: true, node: true, es6: true, commonjs: true }, plugins: [ '@typescript-eslint/eslint-plugin', // 加载插件,使其对代码进行处理 'react', 'import' ], parser: '@typescript-eslint/parser', // 指定AST解析器为ts的eslint解析器 // ... 其他配置 }二、在interface或者type类型声明中,函数生命中的参数类型表达式报 'xxx' is defined but never used.eslintno-unused-vars报错内容:在interface或者type类型声明中,函数生命中的参数类型表达式报 'xxx' is defined but never used.eslintno-unused-vars报错原因:eslint在执行 no-unused-vars 规则检测时,使用的是默认的检测规则,也就是 js 的变量检测规则解决方法:禁用默认的no-unused-vars改为 @typescript-eslint/no-unused-vars 这个规则会排除interface或者type类型声明中的无函数体函数的检测,更改后的rules内容rules: { 'react/jsx-filename-extension': [ 'error', { extensions: ['.js', '.jsx', '.ts', '.tsx'] } ], // ... 其他配置 'eol-last': 2, // 文件以单一的换行符结束 // 'no-unused-vars': [1, { vars: 'all', args: 'after-used' }], // 不能有声明后未被使用的变量或参数 'no-unused-vars': 'off', '@typescript-eslint/no-unused-vars': ['error'], // ... 其他配置 }